Documentation Index Fetch the complete documentation index at: https://auth0-feat-ionic-capacitor-quickstart-modernization.mintlify.app/llms.txt
Use this file to discover all available pages before exploring further.
MQTTは、他のシステムと通信するためのデバイスによく使用される軽量なプロトコルで、 publish/subscribe(パブリッシュ/サブスクライブ) 型のメッセージングプラットフォーム向けに設計されています。詳細については、WikipediaのMQTT をお読みください。
一般には3つのコンポーネントから成り立ちます。
メッセージのpublisher(パブリッシャー)
メッセージのsubscriber(サブスクライバー)
メッセージを仲介するbroker(ブローカー)
メッセージが関連付けられているtopics(トピック)(チャネルまたはサブジェクトとも呼ばれる)の概念があります。トピックはパブリッシャーとサブスクライバー間のメッセージをルーティングします。
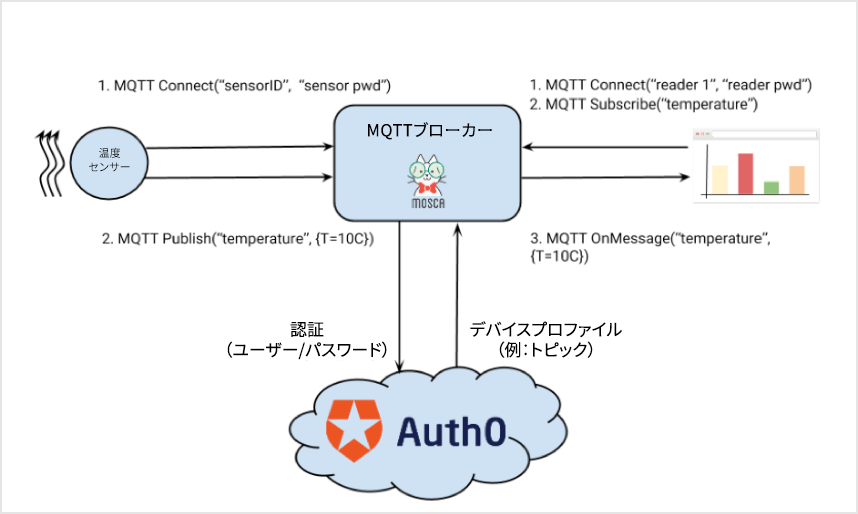
MQTTプロトコルは、usernamesおよびpasswordsに基づいて基本的な認証メカニズムをサポートします。これらの資格情報は、CONNECTメッセージとともに送信されます。
この記事では、nodejsベースのMQTTブローカー(mosca およびAuth0 )間の統合について説明します。この例では、Auth0を使ってpublishersおよびsubscribersのブローカーに対する 認証 を行い、メッセージのルーティングを 認可 します。
ソリューションのコンポーネント ブローカー mosca はホストにとっては簡単で、他のサーバーに埋め込むことができます。このサンプルの目的上、 mosca サーバーを自己ホストします。var mosca = require ( 'mosca' ) var Auth0Mosca = require ( 'auth0mosca' ); var settings = { port: 9999 , }; //'Thermostats' is a Database connection where all devices are registered. var auth0 = new Auth0Mosca ( 'https://eugeniop.auth0.com' , '{Your Auth0 ClientID}' , '{Your Auth0 Client Secret}' , 'Thermostats' ); //Setup the Mosca server var server = new mosca . Server ( settings ); //Wire up authentication & authorization to mosca server . authenticate = auth0 . authenticateWithCredentials (); server . authorizePublish = auth0 . authorizePublish (); server . authorizeSubscribe = auth0 . authorizeSubscribe (); server . on ( 'ready' , setup ); // Fired when the mqtt server is ready function setup () { console . log ( 'Mosca server is up and running' ); } server . on ( 'clientConnected' , function ( client ) { console . log ( 'New connection: ' , client . id ); });
これによって、ポート9999でMQTTメッセージをリッスンするサーバーが作成されます。 mosca では、操作の認証と認可に使用する3つの関数をオーバーライドすることができます。
このサンプルでは、非常に単純なモジュールauth0moscaを使ってこれらの関数を実行します。Auth0は mosca に結びついています。
Auth0Moscaモジュール この小さなモジュール には、 mosca で使用される4つの関数(authenticateWithCredentials、authenticateWithJWT、authorizePublish、authorizeSubscribe)があります。
var request = require ( 'request' ); var jwt = require ( 'jsonwebtoken' ); function Auth0Mosca ( auth0Namespace , clientId , clientSecret , connection ) { this . auth0Namespace = auth0Namespace ; this . connection = connection ; this . clientId = clientId ; this . clientSecret = clientSecret ; } Auth0Mosca . prototype . authenticateWithJWT = function (){ var self = this ; return function ( client , username , password , callback ) { if ( username !== 'JWT' ) { return callback ( "Invalid Credentials" , false ); } // console.log('Password:'+password); jwt . verify ( password , self . clientSecret , function ( err , profile ){ if ( err ) { return callback ( "Error getting UserInfo" , false ); } console . log ( "Authenticated client " + profile . user_id ); console . log ( profile . topics ); client . deviceProfile = profile ; return callback ( null , true ); }); } } Auth0Mosca . prototype . authenticateWithCredentials = function (){ var self = this ; return function ( client , username , password , callback ) { var data = { client_id: self . clientId , // {client-name} username: username . toString (), password: password . toString (), connection: self . connection , grant_type: "password" , scope: 'openid name email' //Details: https:///scopes }; request . post ({ headers: { "Content-type" : "application/json" }, url: self . auth0Namespace + '/oauth/ro' , body: JSON . stringify ( data ) }, function ( e , r , b ){ if ( e ){ console . log ( 'Error in Authentication' ); return callback ( e , false ); } var r = JSON . parse ( b ); if ( r . error ) { return callback ( r , false ); } jwt . verify ( r . id_token , self . clientSecret , function ( err , profile ){ if ( err ) { return callback ( "Error getting UserInfo" , false ); } client . deviceProfile = profile ; return callback ( null , true ); }); }); } } Auth0Mosca . prototype . authorizePublish = function () { return function ( client , topic , payload , callback ) { callback ( null , client . deviceProfile && client . deviceProfile . topics && client . deviceProfile . topics . indexOf ( topic ) > - 1 ); } } Auth0Mosca . prototype . authorizeSubscribe = function () { return function ( client , topic , callback ) { callback ( null , client . deviceProfile && client . deviceProfile . topics && client . deviceProfile . topics . indexOf ( topic ) > - 1 ); } module . exports = Auth0Mosca ;
authenticateWithCredentialsはOAuth2リソース所有者のパスワード資格情報付与 を使って、ブローカーおよびブローカーへのすべての接続を認証します。publisherまたはsubscriberが CONNECT メッセージをブローカーに送信するたびに、authenticate関数が呼び出されます。この関数でAuth0エンドポイントを呼び出し、デバイスのusername/passwordを転送します。Auth0は、これをアカウントストア(コード内の最初のrequest.post)と比較して検証します。検証に成功した場合、JSON Web Token subscriberまたはpublisherを表すclientオブジェクトに追加します。これは、jwt.verify呼び出しで行われます。慣例により、ブローカーに接続されたデバイスはすべて、Auth0にアカウントがあります。
デバイスプロファイルにもtopicsプロパティがあります。これは、この特定のデバイスが許可されたすべてのトピックを含む配列です。上のスクリーンショットでは、thermostat-1aはtemperatureおよびconfigトピックへのパブリッシュ(またはサブスクライブ)が許可されます。
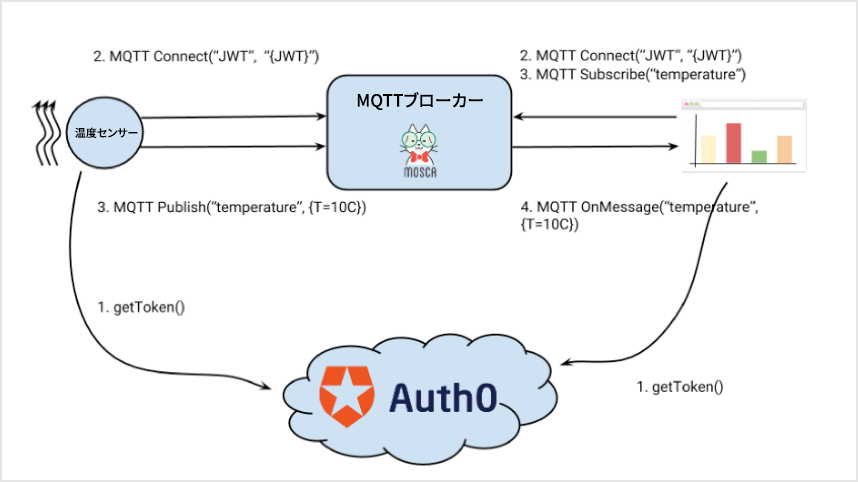
authorizePublish関数とauthorizeSubscribe関数は、要求された特定のトピックがこのリストに載っているかどうかを確認するだけです。authenticateWithJWTは、passwordフィールドでJWTを想定します。この場合の流れは若干異なります。
パブリッシャーとサブスクライバーがトークンを取得する
moscaに接続してJWTを送信するmoscaがJWTを検証するメッセージが送信されサブスクライバーに再送信される
パブリッシャーとサブスクライバーは何らかの方法でJWTを取得します。ブローカーはAuth0と通信する必要はなくなりました。JWTは自己完結型のアーティファクトであり、署名に使用するシークレットで検証することができます。
パブリッシャー このサンプルの場合、パブリッシャーはmqttモジュールを使用する単純なnodejsプログラムであり、正しい資格情報を追加します。
var mqtt = require ( 'mqtt' ) , host = 'localhost' , port = '9999' ; var settings = { keepalive: 1000 , protocolId: 'MQIsdp' , protocolVersion: 3 , clientId: 'Thermostat 1a' , username: 'thermostat-1a' , password: 'the password' } // client connection var client = mqtt . createClient ( port , host , settings ); setInterval ( sendTemperature , 2000 , client ); function sendTemperature ( client ){ var t = { T: Math . random () * 100 , Units: "C" }; client . publish ( 'temperature' , JSON . stringify ( t )); }
もちろん、usernameとpasswordは、Auth0に保存されているものに一致しなければなりません。
サブスクライバー サブスクライバーはパブリッシャーに非常に似ています。
var mqtt = require ( 'mqtt' ) , host = 'localhost' , port = '9999' ; var settings = { keepalive: 1000 , protocolId: 'MQIsdp' , protocolVersion: 3 , clientId: 'Reader-X1' , username: 'reader-X1' , password: 'the password' } // client connection var client = mqtt . createClient ( port , host , settings ); client . subscribe ( 'temperature' ); client . on ( 'message' , function ( topic , message ) { if ( topic === 'temperature' ) { console . log ( 'New reading' , message ); } });
Summary(概要) ご覧のように、Auth0はさまざまなシナリオで簡単に使用することができます。Auth0のユーザーストアを使ってデバイスを管理します。時間や場所、デバイスIDといった他の状況に基づいて、はるかに洗練された認証ルールを記述することも当然可能です。これらはすべて、追加のプロファイル属性やルールを通じて非常に簡単に実装することができます。柔軟なAuth0 Profileが、任意のアーティファクト(この例のtopicsなど)をサポートするためにどのように拡張できるかについても説明しています。
Rules(ルール)の詳細については、「Auth0 Rules」 を確認してください。
資格情報(username/password)を安全でないネットワークを介して送信することは絶対に避けてください。メッセージ内容が公開されることを防ぐTransport Level Securityを提供する他の実装もあります。1つの例として、 mosca はTLSをサポートします。すべてのトラフィックが閉域網を通る場合を除き、運用環境への導入ではこれが優先されるでしょう。
本記事の編集にご協力いただき、素晴らしい mosca を構築していただいたMatteo Collina 氏に感謝の意を表します。